














 Tejumo日本語EN
User guide
Learn how to record, edit, organize and export your workflows.
01
Before you begin
Tejumo records actions on Windows and creates draft instructions with screenshots. Automatically generated steps are a starting point, not a finished manual. Check them against the actual screens and actions, and make any necessary corrections before sharing.
A set of actions recorded from start to stop—for example, registering a request.
One instruction within a flow, made up of a heading, description and optional image.
A named container for related flows. Add a description and organize it with subfolders, up to five levels deep.
02
Find your way around the home screen
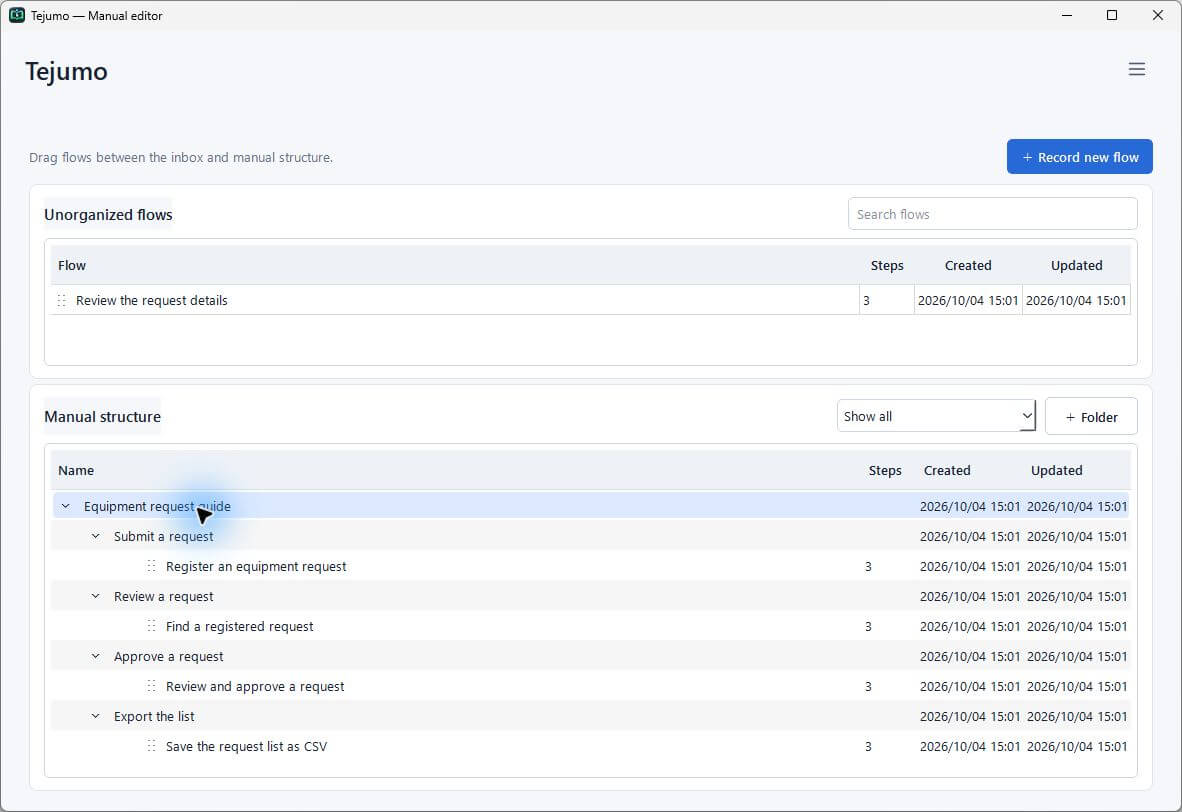
The Unorganized flows area at the top contains flows not yet assigned to a folder. Manual structure below shows flows organized into folders. Drag flows between these two areas.
- Record a new flow
Select + Record new flow at the top.
- Open an existing flow
Double-click a flow, or right-click it and choose Open in editor. Use the search field to find an unorganized flow by name.
- Understand the inbox order
Unorganized flows are sorted by most recently updated, then most recently created when update times match. Their order cannot be changed manually.
- Focus on one manual
Select a top-level folder from the Manual structure dropdown. Choose Show all to see everything again.
03
Record your actions
- Name the flow
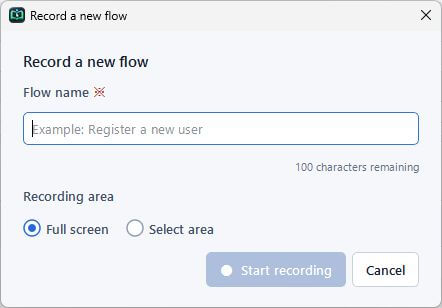
Open + Record new flow and enter a flow name, such as “Register a request”. A name is required and may contain up to 100 characters.
- Choose the recording area
Select Full screen or Select area. For a selected area, follow the prompt, drag over the screen, and choose Use this area. Press Esc to cancel area selection.
- Start recording
Select Start recording, review the five-minute recording notice and confirm. The main window hides and a small recording controller displays the time remaining. Drag a non-button area of the controller if it is in the way.
- Work in the target app
Carry out the actions you want to explain. Tejumo records interaction details and screenshots at relevant moments. After a screen changes, wait for it to settle before continuing. Very rapid actions may reduce the accuracy of captured steps and images.
- Stop or cancel
Choose Stop recording when finished. Recording also stops automatically after five minutes and creates steps from the actions captured so far. Choose Cancel recording to discard the recording.
04
Review and edit the generated steps
The editor shows the step list on the left and the selected step’s heading, description and image on the right. Target names and screen descriptions may be misidentified; compare them with the real task.
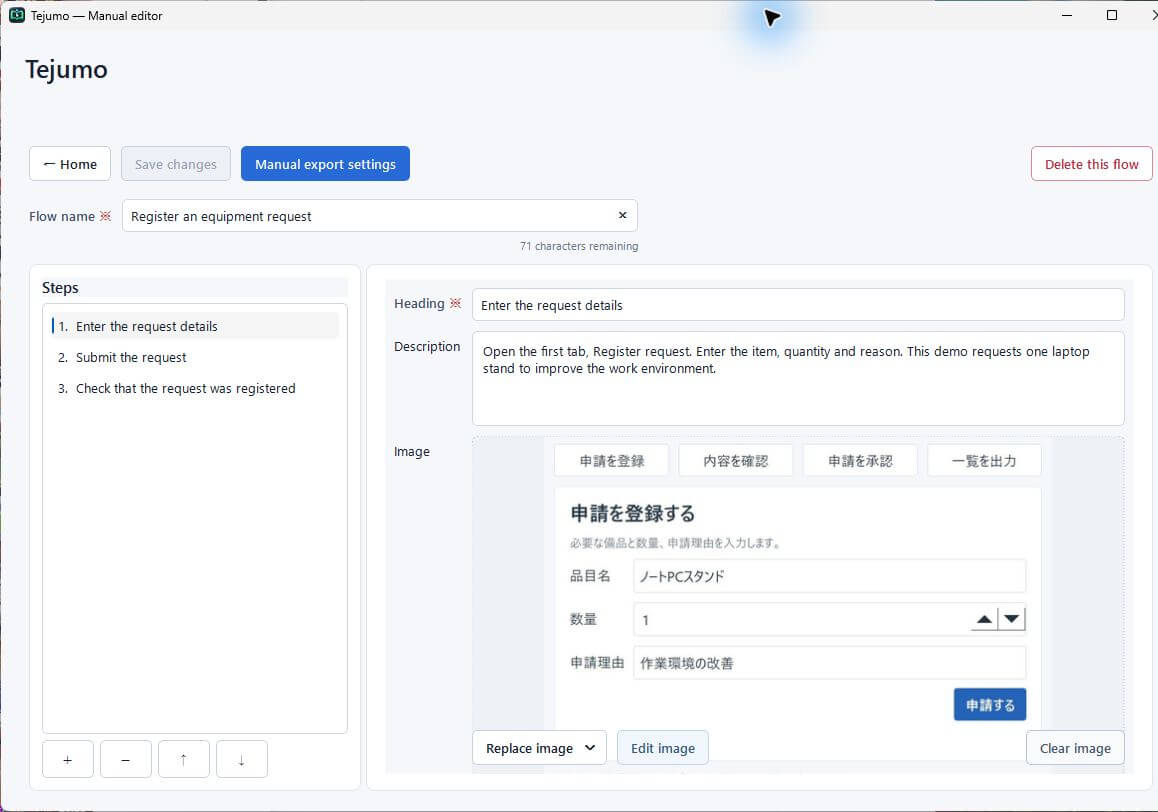
- Check the flow name
Edit Flow name at the top if needed. It cannot be empty.
- Review each step
Select a step and correct its heading and description. Every step needs a heading.
- Adjust the number and order of steps
Use + and - to add or remove steps. Reorder them with ↑, ↓ or drag-and-drop. Remove unnecessary clicks and add missing explanations.
- Save your changes
Select Save changes. Confirm that saving completes before returning Home.
05
Replace and annotate images
Select Replace image to choose a recorded screenshot, capture a new area, or use a PNG, JPEG or WebP file. Clear image makes the step text-only.
- Replace an image
Choose the replacement method. For a new capture, follow the prompt, drag an area and confirm with Use this area. Review the captured image, then confirm its use.
- Add text and shapes
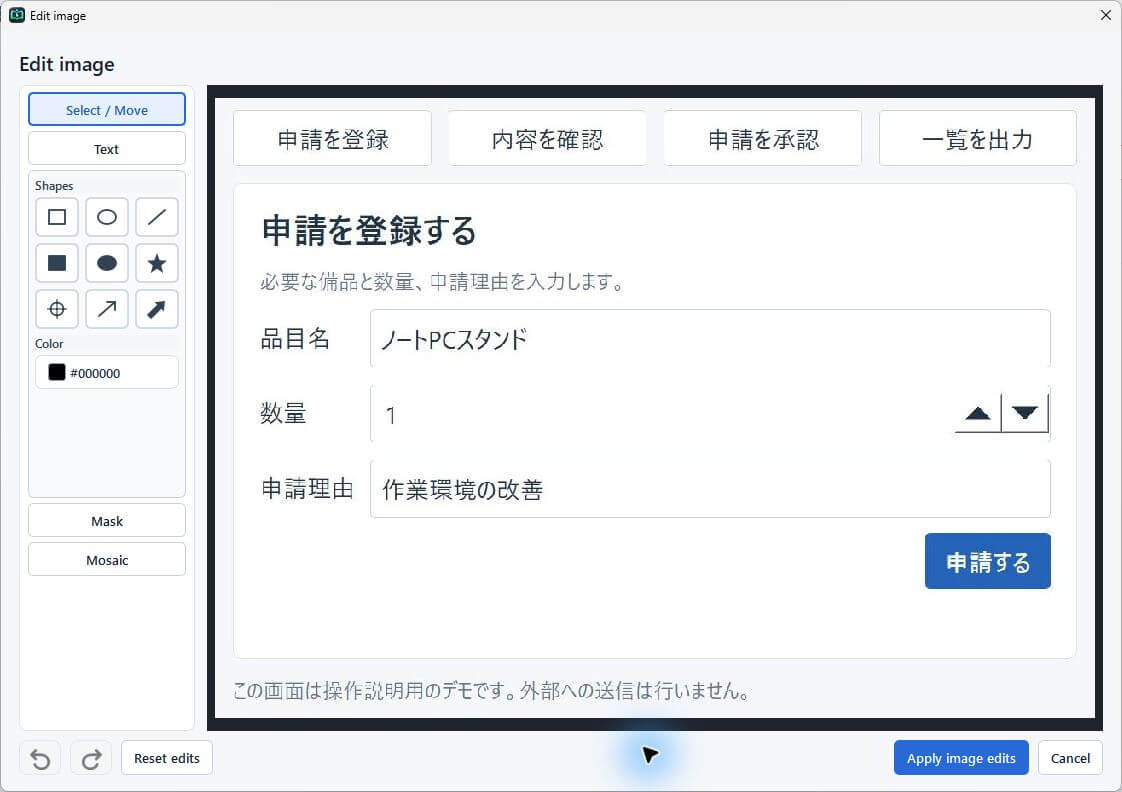
Select Edit image. Choose text or a shape: rectangle, ellipse, line, filled shape, star, target, arrow or block arrow. Change color, line style and thickness where available. Use Select / Move to reposition an object. The text editor offers bold, size and color. Select an unwanted object and press Backspace or Delete to remove it.
- Hide sensitive areas
Mask covers an area in solid black. Mosaic pixelates it. Check that the intended information is fully covered before sharing.
- Apply and save
Select Apply image edits, then Save changes in the manual editor. Replaced or cleared images must also be saved.
06
Organize a manual with folders
- Create a top-level folder
In Manual structure, select + Folder. Enter a name of up to 50 characters and an optional description. Folder descriptions are included in exported manuals.
- Add subfolders
Right-click a folder and select Create subfolder…. You can nest folders up to five levels. For example: Equipment request guide → Submit a request → Register an equipment request.
- Organize your flows
Drag a flow from Unorganized flows into a folder. Drag it back to return it to the inbox. Within Manual structure, drag folders and flows to change their order, or use the right-click actions Move up and Move down.
- Edit a folder
Right-click it and select Edit folder… to change its name or description.
07
Protect a finished manual
Right-click a completed top-level folder and choose Protect. Folders and flows beneath it cannot be edited, moved or deleted. Choose Remove protection when changes are needed. Protected manuals can still be viewed and exported.
Deleting a flow or folder permanently removes its associated recordings and images. This cannot be undone. Make a backup first if you may need the data later.
08
Export an HTML or PDF manual
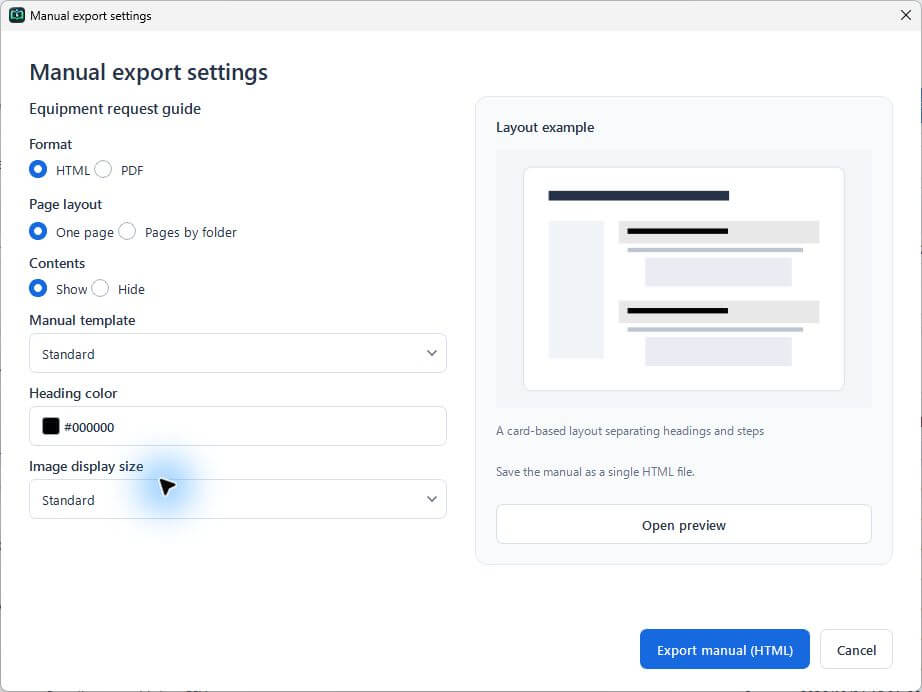
For a single flow, select Manual export settings in the editor. For a whole manual, right-click its top-level folder and choose Manual export settings. Subfolders are included in the top-level export.
- Choose the format
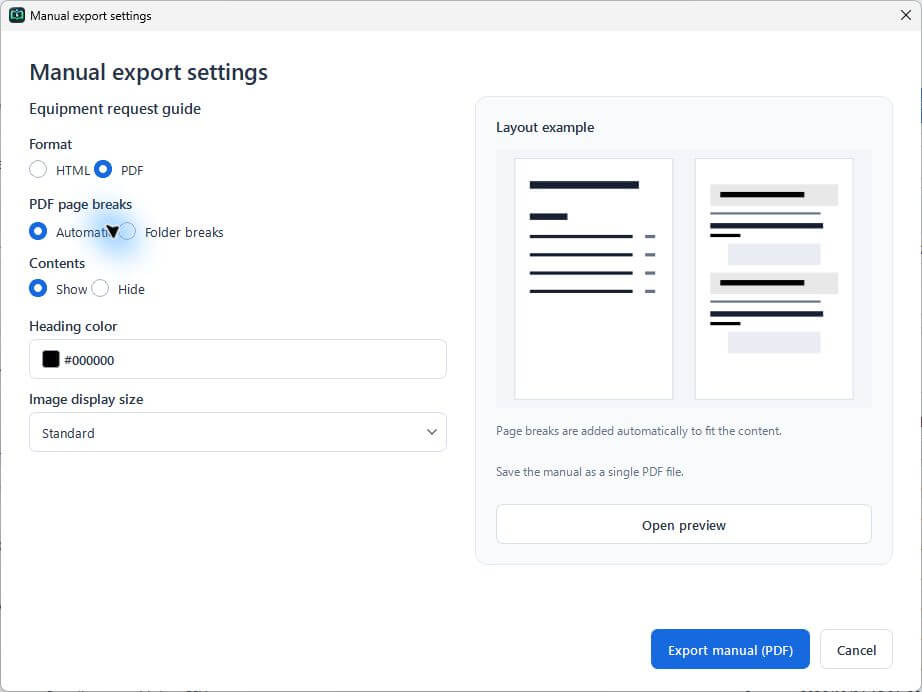
Select HTML for viewing in a browser, or PDF for printing and distribution.
- Choose the page layout
For HTML, choose One page or Pages by folder. With folder pages, adjust the page breaks to keep a folder on its parent page or give it a separate page. For PDF, choose Automatic breaks or Folder breaks, then select which folders start a new page. Long content still breaks automatically. Without eligible subfolders, PDF uses automatic breaks.
- Adjust the appearance
Choose whether to show the contents, the heading-band color and the image display size. HTML offers Standard, Simple and Document templates. PDF uses a shared layout without template selection. Select Open preview to see the actual result.
- Export and save
Select Export manual (HTML) or Export manual (PDF) and choose a save location. Single-page HTML is saved as an HTML file; folder-based HTML as a ZIP file; PDF as one PDF file.
09
Settings, backups and help
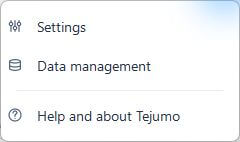
Open the three-line Menu button at the top right of Home. Choose Settings, Data management or Help and about Tejumo.
- Choose a language
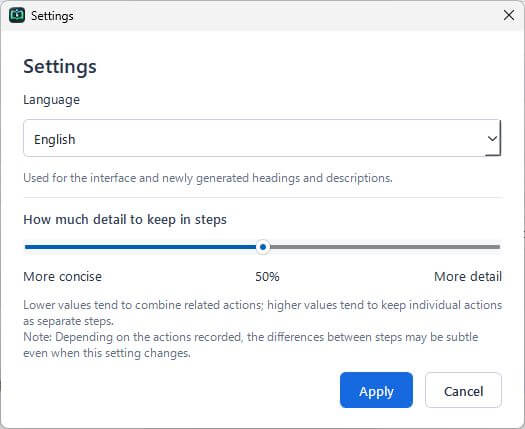
Open Settings, select Japanese or English and apply. This changes the app interface and the language used for newly generated headings and descriptions. Existing text is not translated automatically. The User guide and Official website links also open in the selected language. The contact page remains in Japanese.
- Adjust step detail
Move the slider from 0% to 100% and apply. The default is 50%. Lower values tend to combine related actions; higher values tend to retain more individual actions. Some workflows show little or no difference when this changes. It controls how recordings are organized, not recognition accuracy.
Back up and restore
Open Data management. Create a backup to save folders, flows and recording images in a ZIP. Use it before major changes or to move to another PC. To restore, select the ZIP created by Tejumo without extracting it. Restoring replaces the current data at the destination, so review the confirmation carefully.
Help and app information
Help and about Tejumo opens the user guide, contact page and official site. It also shows the app version, privacy policy, terms of use and third-party library licenses.
10
Troubleshooting
Too few steps or a missing screenshot
Check that the target was inside the recording area. Wait for screen transitions to finish before continuing. You can replace an image with another recorded capture or a new screenshot, and add any missing steps.
The target name is incorrect
Screen reading and target identification can vary with the app or website. Correct the heading and description to match the actual interface.
Links in an HTML ZIP do not work
Extract the entire ZIP and open index.html from the extracted folder.
I cannot edit a flow
Check whether its top-level folder is protected. Remove its protection before editing.